> ## Documentation Index
> Fetch the complete documentation index at: https://docs.thickdot.com/llms.txt
> Use this file to discover all available pages before exploring further.
# Upload Packing Slips and Receiving Documents to the Platform
> Learn supported file formats, size limits, and all three upload methods: drag-and-drop, file browser, and mobile device camera capture.
The Upload page is the entry point for every document in the platform. Once you submit a file, the AI pipeline immediately takes over, extracting header fields and line items, matching against your ERP purchase orders, and either auto-approving the receipt or routing it to your review queue. Getting documents in quickly and cleanly is the first step toward a fully automated receiving workflow.
 ## Supported Formats
The platform accepts both digital documents and scanned or photographed images. Before uploading, confirm your files meet the requirements below.
| Format | Notes |
| -------------- | --------------------------------------------------------------------- |
| **PDF** | Native digital PDFs and scanned PDFs are both supported |
| **PNG** | Lossless image format; ideal for screenshots of digital packing slips |
| **JPG / JPEG** | Standard photo format; suitable for camera captures |
| **TIFF** | High-resolution scans from document scanners |
| **WEBP** | Modern compressed image format |
* **Maximum file size:** 50 MB per file
* **Photos taken on mobile devices** (iOS or Android) are fully supported through the Take Photo upload method described below
Files larger than 50 MB will be rejected at upload time with an error message. If you regularly receive files above this limit, consider compressing scanned PDFs or splitting multi-document files before uploading.
## How to Upload
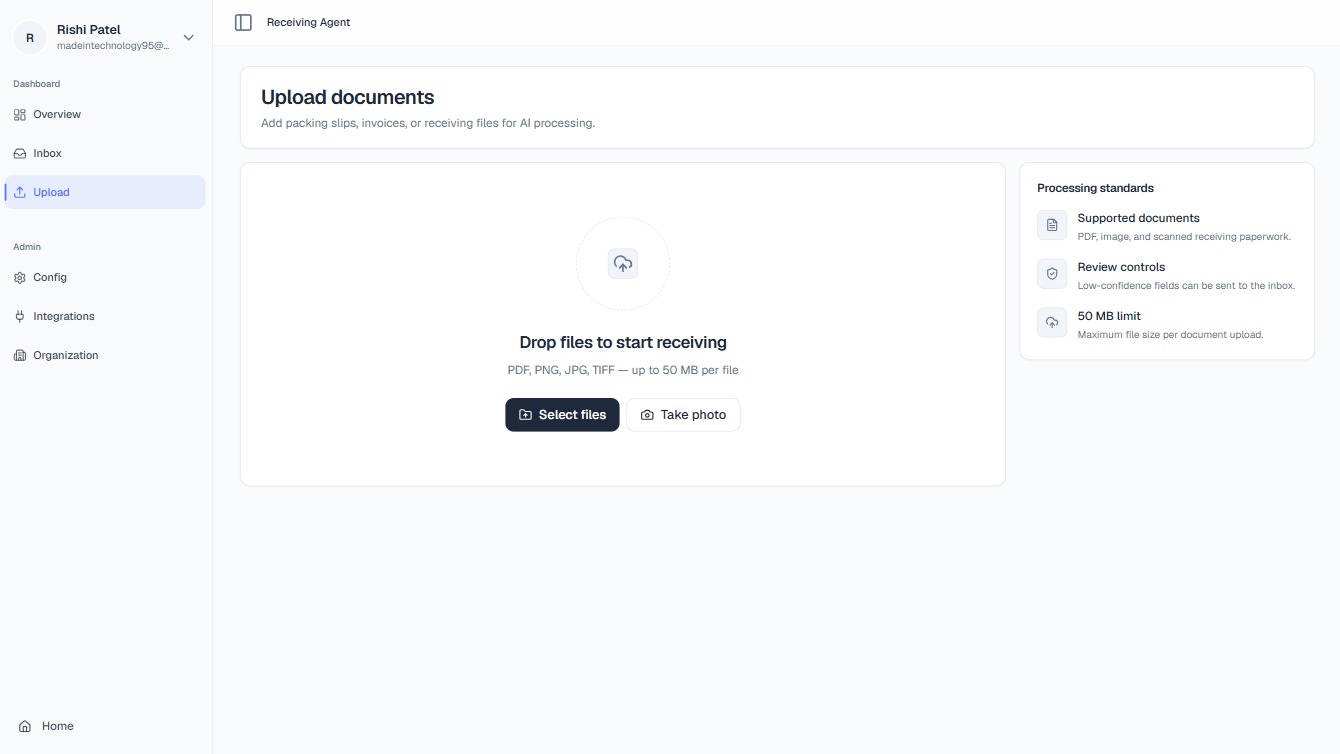
From the Dashboard, click the **Upload** button in the top navigation. The upload zone occupies the center of the page.
The platform provides three ways to get documents into the system. Select the method that matches your current device and workflow.
Open your system file explorer (Finder, Windows Explorer, or equivalent) alongside the browser window. Select one or more files, then drag them directly onto the **drop zone**, the large dashed rectangle in the center of the page. The zone will highlight when you hover over it with files. Release to begin the upload. You can drop multiple files in a single gesture.
Click the **Select Files** button inside the drop zone. Your operating system's native file browser will open. Navigate to the files you want to upload, select one or more (use Shift-click or Cmd/Ctrl-click for multiple files), and click **Open** or **Choose**. The selected files will be added to the upload queue immediately.
**Available on mobile and tablet devices only.** Tap the **Take Photo** button to open your device's camera. Point the camera at the physical packing slip, ensure the document is well-lit and fully in frame, then capture the image. The photo is added to the upload queue automatically. For best extraction accuracy, keep the document flat and avoid shadows across printed text.
After selecting files, each one appears as a row in the **file queue** below the drop zone, showing the filename and file size. If you accidentally added the wrong file, click the **✕** button on its row to remove it before submitting. You can continue adding more files at this stage by dragging additional items onto the zone or clicking **Select Files** again.
Click the **Upload N files** button, where *N* reflects the number of files in your queue. The platform begins transferring all files to the server simultaneously. Do not close or refresh the page until all files show a success or error status.
## Upload Status
As files transfer, each queue row updates with a real-time status indicator:
| Indicator | Meaning |
| ----------------------- | ------------------------------------------------------------------------------------------------------------------------------------------------------------ |
| **Spinner (animating)** | The file is currently transferring to the server |
| **Green checkmark** | Upload succeeded, the file has been received and queued for AI processing. A link to the Document Details page appears on the row |
| **Red error icon** | Upload failed, an error message explains the cause (for example, *"File exceeds 50 MB limit"* or *"Unsupported file type"*). Correct the issue and try again |
After a successful upload, your document immediately enters the AI processing queue and will appear in the **Document Inbox** within seconds. You do not need to take any further action unless the AI routes it to **Needs Review**.
After a batch upload, click **Clear completed** to remove all successful rows from the queue view. This gives you a clean slate before starting the next batch and makes it easier to spot any files that still show errors.
## Supported Formats
The platform accepts both digital documents and scanned or photographed images. Before uploading, confirm your files meet the requirements below.
| Format | Notes |
| -------------- | --------------------------------------------------------------------- |
| **PDF** | Native digital PDFs and scanned PDFs are both supported |
| **PNG** | Lossless image format; ideal for screenshots of digital packing slips |
| **JPG / JPEG** | Standard photo format; suitable for camera captures |
| **TIFF** | High-resolution scans from document scanners |
| **WEBP** | Modern compressed image format |
* **Maximum file size:** 50 MB per file
* **Photos taken on mobile devices** (iOS or Android) are fully supported through the Take Photo upload method described below
Files larger than 50 MB will be rejected at upload time with an error message. If you regularly receive files above this limit, consider compressing scanned PDFs or splitting multi-document files before uploading.
## How to Upload
From the Dashboard, click the **Upload** button in the top navigation. The upload zone occupies the center of the page.
The platform provides three ways to get documents into the system. Select the method that matches your current device and workflow.
Open your system file explorer (Finder, Windows Explorer, or equivalent) alongside the browser window. Select one or more files, then drag them directly onto the **drop zone**, the large dashed rectangle in the center of the page. The zone will highlight when you hover over it with files. Release to begin the upload. You can drop multiple files in a single gesture.
Click the **Select Files** button inside the drop zone. Your operating system's native file browser will open. Navigate to the files you want to upload, select one or more (use Shift-click or Cmd/Ctrl-click for multiple files), and click **Open** or **Choose**. The selected files will be added to the upload queue immediately.
**Available on mobile and tablet devices only.** Tap the **Take Photo** button to open your device's camera. Point the camera at the physical packing slip, ensure the document is well-lit and fully in frame, then capture the image. The photo is added to the upload queue automatically. For best extraction accuracy, keep the document flat and avoid shadows across printed text.
After selecting files, each one appears as a row in the **file queue** below the drop zone, showing the filename and file size. If you accidentally added the wrong file, click the **✕** button on its row to remove it before submitting. You can continue adding more files at this stage by dragging additional items onto the zone or clicking **Select Files** again.
Click the **Upload N files** button, where *N* reflects the number of files in your queue. The platform begins transferring all files to the server simultaneously. Do not close or refresh the page until all files show a success or error status.
## Upload Status
As files transfer, each queue row updates with a real-time status indicator:
| Indicator | Meaning |
| ----------------------- | ------------------------------------------------------------------------------------------------------------------------------------------------------------ |
| **Spinner (animating)** | The file is currently transferring to the server |
| **Green checkmark** | Upload succeeded, the file has been received and queued for AI processing. A link to the Document Details page appears on the row |
| **Red error icon** | Upload failed, an error message explains the cause (for example, *"File exceeds 50 MB limit"* or *"Unsupported file type"*). Correct the issue and try again |
After a successful upload, your document immediately enters the AI processing queue and will appear in the **Document Inbox** within seconds. You do not need to take any further action unless the AI routes it to **Needs Review**.
After a batch upload, click **Clear completed** to remove all successful rows from the queue view. This gives you a clean slate before starting the next batch and makes it easier to spot any files that still show errors.